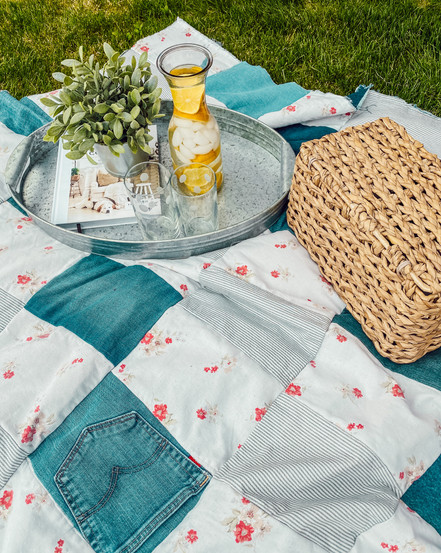
Denim Rag Quilt
- Brinly Naylor

- May 5, 2021
- 4 min read
Updated: May 11, 2021
Today on the blog we are showing you how to make these cute Denim Rag Quilts. They are super simple to put together and trust us we are not pro sewers. Let us know if you try it out!

Step 1:
Gather Your Supplies
Fabric Choices: For our quilts, we used 4 fabrics each. For this one, we did two striped patterns, a floral blue pattern, and a solid grey color (not pictured). We pretty much had all the fabric on hand and some of the fabric was actually sheet sets.
Denim: Save all your denim you can and ask family and friends if they have any they are getting rid of. We love to mix denim with other fabrics. It makes such cute patterns! Another tip is when going to the yard sale look for old denim jeans see what price you can talk them down to. You can usually get it for a good price!
Fabric Scizzors: HERE are the ones that I use!
Cutting Mat or Tape Measure/Ruler: I would suggest a cutting mat. We got ours passed down to us but you can find similar ones/smaller ones on Amazon that would work just as well. I will link a page to shop HERE.
Step 2:
Measure & Cut Fabric Blocks
Now you will start figuring out how big you want to cut the blocks. Once you get a few cut out, lay them next to each other and make sure you like how it looks. Once you figure out the measurements cut them all out. This definitely takes a lot of time. Find a good show or podcast to listen to and cut away!
Our Measurements:
Height: 10 & 1/2
Length: 7 & 1/2
Step 3:
Cut Out Denim Pieces
Layout denim jeans and use a piece of the fabric pieces that you have already cut out as a stencil. You can pin it in place to hold it or just cut around it. Make sure that you are getting as many pieces out of the jeans as possible. We especially love to cut out the pockets on the jeans so don't toss them!
Step 4:
Match up Denim and Fabric Pieces
Match up the denim and fabric pieces together to get ready to figure out the pattern. Make sure that the patterned side is facing outwards. Every single fabric piece needs to be matched with a denim one.
Step 5:
Figure Out Your Pattern
You will want to figure out which pattern you want for your quilt. Remember one side is going to be a different pattern than the other so keep that in mind when laying out your blocks. I would suggest laying out two or three rows taking a picture and then flipping them over and taking another one so you can see what you want to change.
Also, you will want to figure out how many blocks for the length and how many for the width.
Here are our blankets blocks high and blocks across.
Length:
Width:
Step 6:
Sew Around Each of the Blocks
This step takes up quite a bit of time. Make sure you have them all matched up and you have your pattern lined out before you start and put them back in order of your pattern. This saves a lot of time when sewing them all together.
We found that if you sew down just one side at a time and then cut the strings after you have sewn down one side then you can do it a lot quicker rather than rotating them and cutting them each time. This is shown in the first picture.
We also sew on the one-inch sewing line on the sewing machine (see on the third photo) around the whole block. We also do not backstitch on this step.
Step 7:
Start Sewing Together Your Rows
Once you have all the blocks lined out you will start sewing them in rows. Remember to backstitch when getting to each end.
Also, make sure that when sewing them together you do not get them out of order. That is why we suggest laying them all out beforehand. Once you get a row sewn together put it back in place and make sure the pattern is still lining up. Double and triple-check this! You don't want to have to unpick a whole quilt because of one little mistake.
Step 8:
Sew All the Rows Together
In this step, you will sew all of the rows together. Depending on which side you want the fraying on is how you will sew them together. The fraying part should only be on one side of the quilt. We had the frayed side on the side with more denim to give it some more color but you can choose whatever you think will look best.
Step 9:
All Done & Ready To Use
Now your quilt should be all done and ready to use. We suggest throwing it in the washing machine to start creating the raggedy edges on the other side. After it comes out of the washing machine you can cut the long strings off.

Here is the final product of our two rag denim blankets! We love how they turned out and they were pretty easy just a little time-consuming. We dedicated two whole Saturdays to making them with one of us cutting out the blocks and the other sewing them together. With a team of two, it wasn't too bad!

Picnic Blanket
Table Cloth

Thank you for reading and let us know if you try this out! We would love to see how yours turn out. Tag us on Instagram @poppyandbloomco or leave us a comment on the blog!


Comments